[insert page=’home-vagrant-cloudzen-website-git-gstzen-turquoise-content-articles-gst-writings-tally-sidebarnew-no-mkd’ display=’content’]
Tally Integration with GSTZen for GSTR 2A Reconciliation in Tally
GSTZen helps you to seamlessly upload your purchase invoice into GSTZen using Tally. This makes it easier to perform GSTR 2A/2B reconciliation in Tally through GSTZen. Follow the simple steps for 2A/2B Tally integration. To know more about 2A reconciliation refer to GSTR 2A Reconciliation with GSTZen. To know more about 2B reconciliation refer to GSTR 2B Reconciliation with GSTZen.
What should you do?
- Choose the Tally company
- Process Ledger details
- Download Vouchers from Tally
- Process and Save invoices to GSTZen Purchase Register
System Requirements
Download and install the GSTZen Agent

Note: Your PC or anti virus might show that the application may be harmful. If, so add the application as an exception in your anti-virus settings.
When the application is running, the icon will be shown in your task bar.

Tally ERP 9
- Ensure that Tally ERP 9 is installed and running in your computer
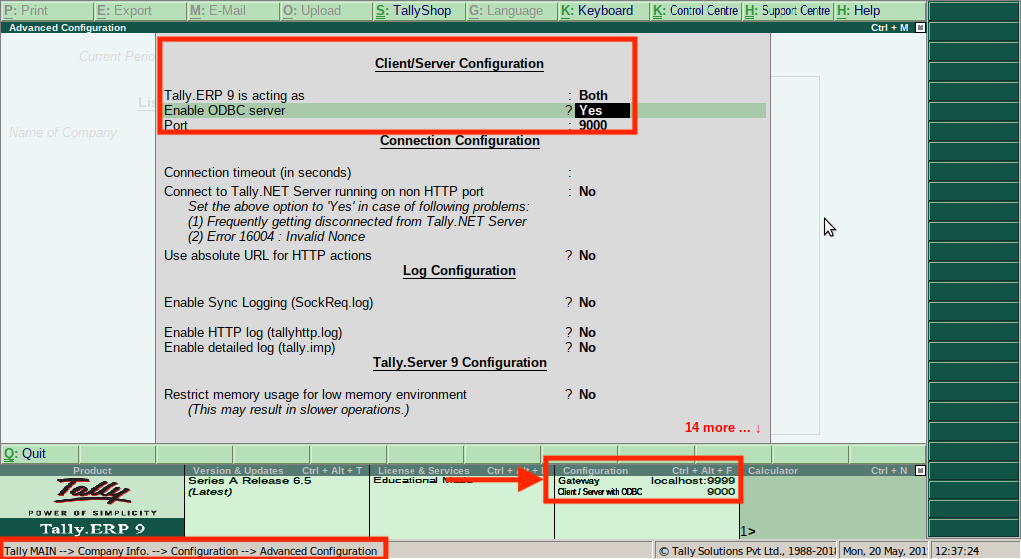
- Tally server need to run on Port 9000 of your computer
- To configure Tally server to Port 9000, follow the path Tally Main -> Company Info -> Configuration -> Advanced Configuration.

Tally ERP 9 setting
Tally Prime
- Ensure that Tally Prime is installed and running in your computer
- Tally server need to run on Port 9000 of your computer
- To configure Tally server to Port 9000, follow the path Tally Main -> Help:F1 -> Settings -> Connectivity.

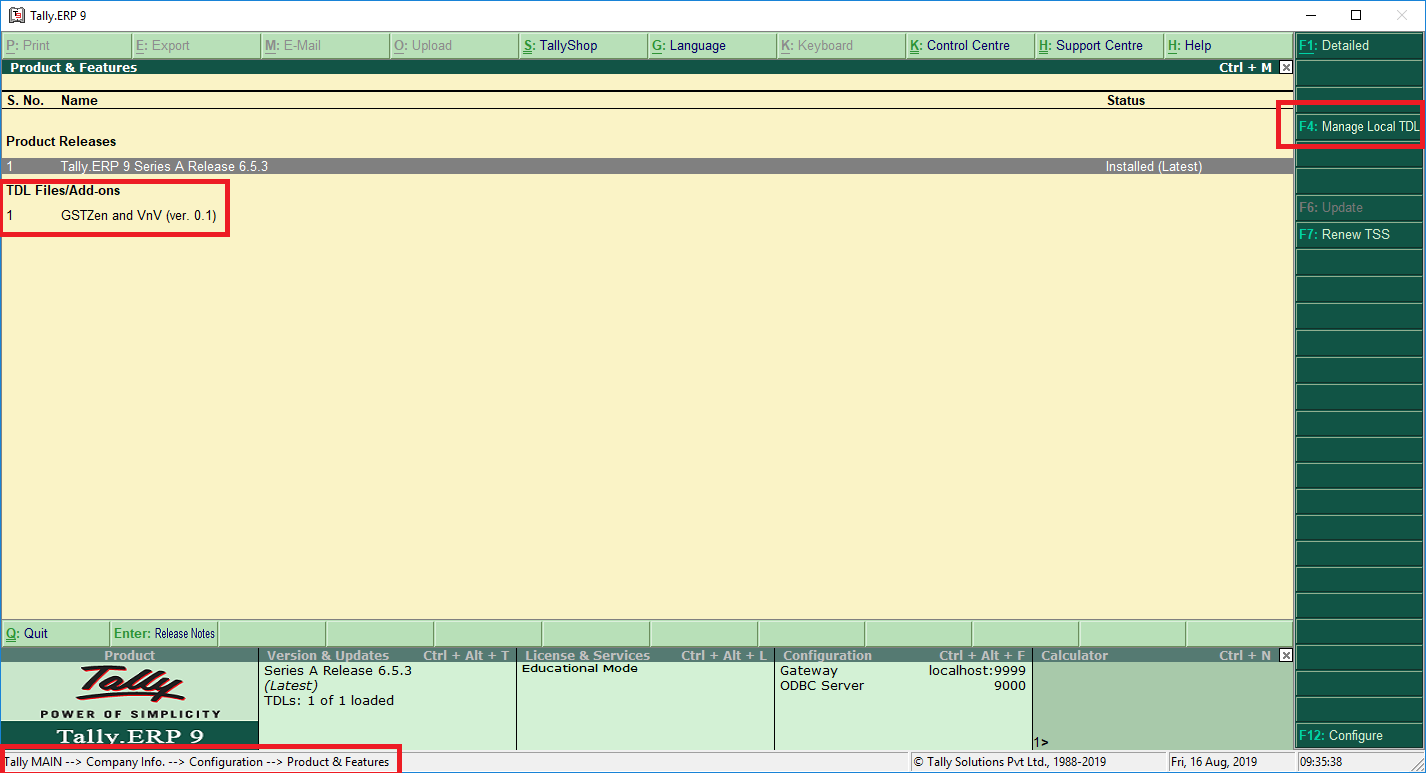
GSTZen Tally TDL / Add-on
- Download GSTZen’s Tally TDL / Add-on.
- Save and Install the downloaded Add-on file in your computer.
Tally ERP 9

Add GSTZen Tally TDL

Tally ERP 9 listing the number of addons
Tally Prime
To add the TDL, follow the path, Tally Main -> Help:F1 -> TDLs and AddOns -> F4: Manage local TDLs

Add GSTZen Tally TDL

Google Chrome
- Tally integration with GSTZen will only work on Google Chrome.
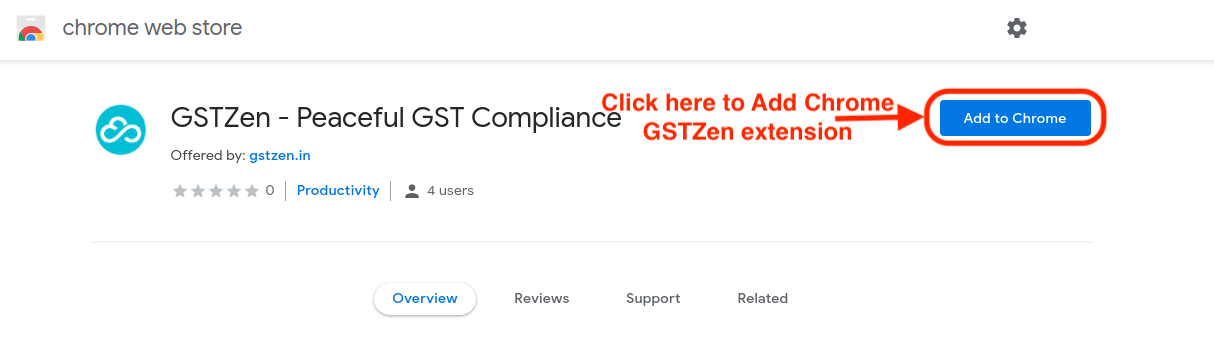
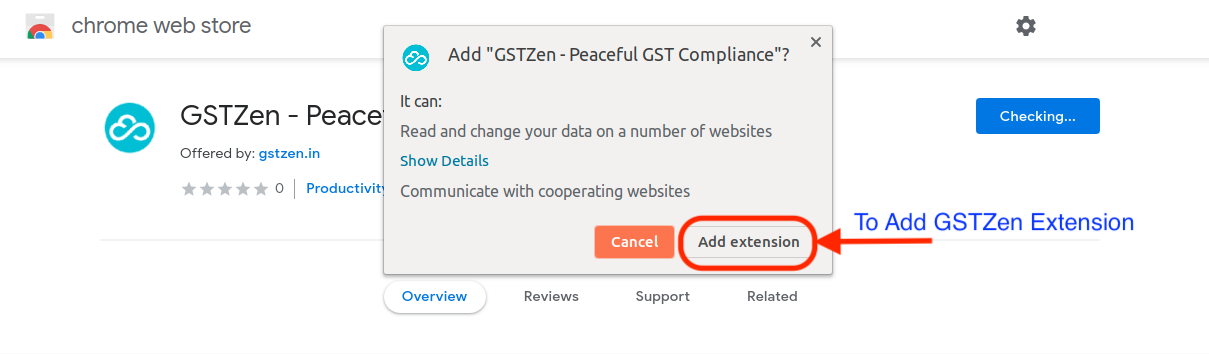
GSTZen Chrome Extension
- GSTZen Chrome Extension is a tool that we use to communicate between Tally and GSTZen software.
- Install GSTZen’s Chrome Extension from the Google Chrome App Store.

Adding GSTZen Chrome extension

Installing GSTZen Chrome extension
Company Info ->
Configuration -> Advanced Configuration.
{ .px-0 .col-md-9 .offset-md-1 .center-block .img-fluid .cz-img-border .image-process-container-col-sm-9 }
#### 2) GSTZen Tally TDL / Add-on
[Click here](https://img-www.gstzen.in/pdfs/tally/GSTZen-and-Vnv-v01.tcp) to download
[GSTZen’s Tally TDL / Add-on](https://img-www.gstzen.in/pdfs/tally/GSTZen-and-Vnv-v01.tcp).
Save the downloaded file in your computer. Install the Add-on as shown in
the below screenshot.
{ .px-0 .col-md-9 .offset-md-1 .center-block .img-fluid .cz-img-border .image-process-container-col-sm-9 }
{ .px-0 .col-md-9 .offset-md-1 .center-block .img-fluid .cz-img-border .image-process-container-col-sm-9 }
#### 3) Google Chrome
GSTZen’s integration works only with Google Chrome. For best experience,
please download and use the [latest version of Google
Chrome](https://www.google.com/chrome/).
#### 4) GSTZen Chrome Extension
Install GSTZen’s Chrome Extension from the [Google Chrome App
Store](https://chrome.google.com/webstore/detail/gstzen-peaceful-gst-compl/kalikdgeljhpjdefbmonglphknlbjjgi).
[Click here to install the extension](https://chrome.google.com/webstore/detail/gstzen-peaceful-gst-compl/kalikdgeljhpjdefbmonglphknlbjjgi).
{ .px-0 .col-md-9 .offset-md-1 .center-block .img-fluid .cz-img-border .image-process-container-col-sm-9 }
{ .px-0 .col-md-9 .offset-md-1 .center-block .img-fluid .cz-img-border .image-process-container-col-sm-9 }
### Steps to upload your Purchase Register.
Follow the steps one by one and you will be able to easily upload your
Purchase Register into GSTZen.
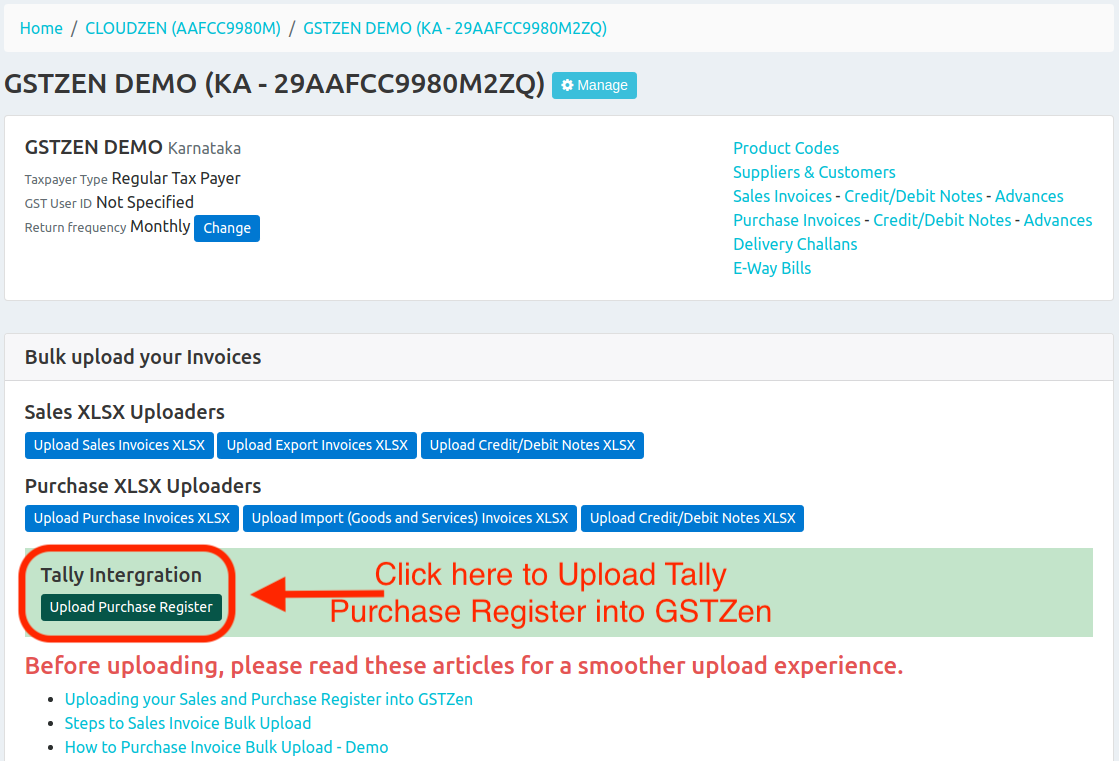
#### Open the Purchase Register Importer
You can open the Purchase Register Importer page by clicking on the button
in your GSTIN’s page in GSTZen.
{ .px-0 .col-md-9 .offset-md-1 .center-block .img-fluid .cz-img-border .image-process-container-col-sm-9 }
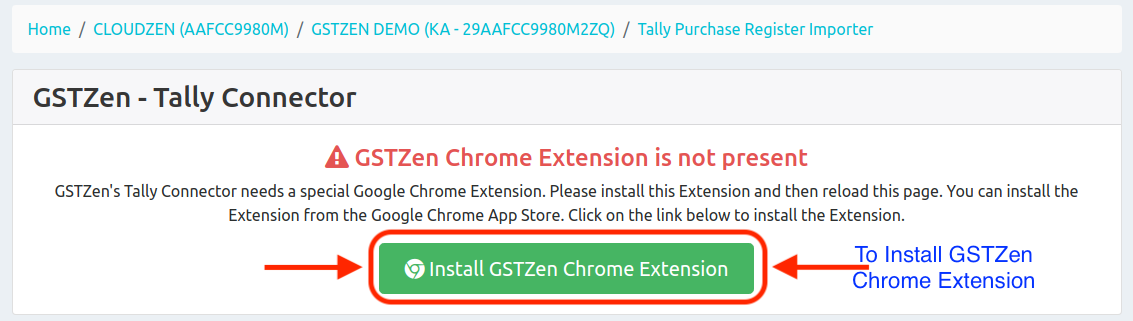
#### STEP 0 – Make sure all System requirements are installed.
If you do not have the GSTZen’s Chrome extension, your screen will show the
following error message. You can click on the button shown in this page and
install the extension.
{ .px-0 .col-md-9 .offset-md-1 .center-block .img-fluid .cz-img-border .image-process-container-col-sm-9 }
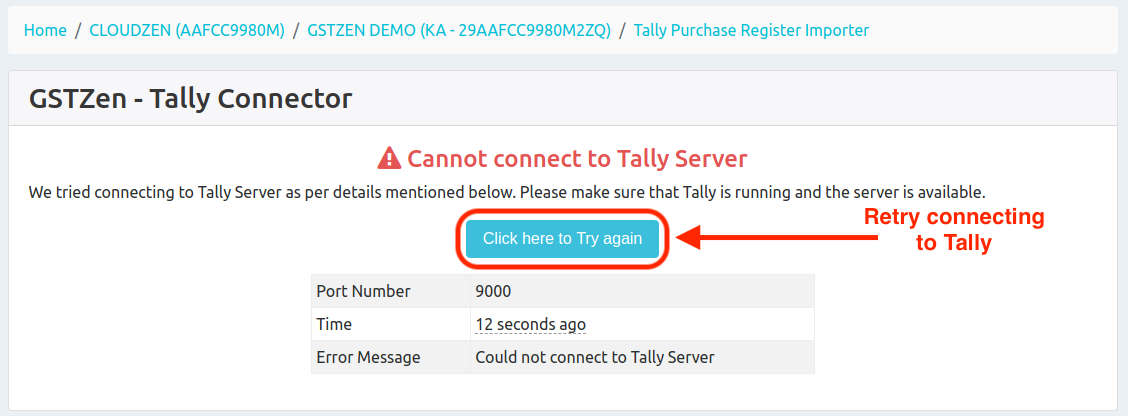
If you not running Tally, you will see the following error message. Please make
sure that you are running Tally and check again.
{ .px-0 .col-md-9 .offset-md-1 .center-block .img-fluid .cz-img-border .image-process-container-col-sm-9 }
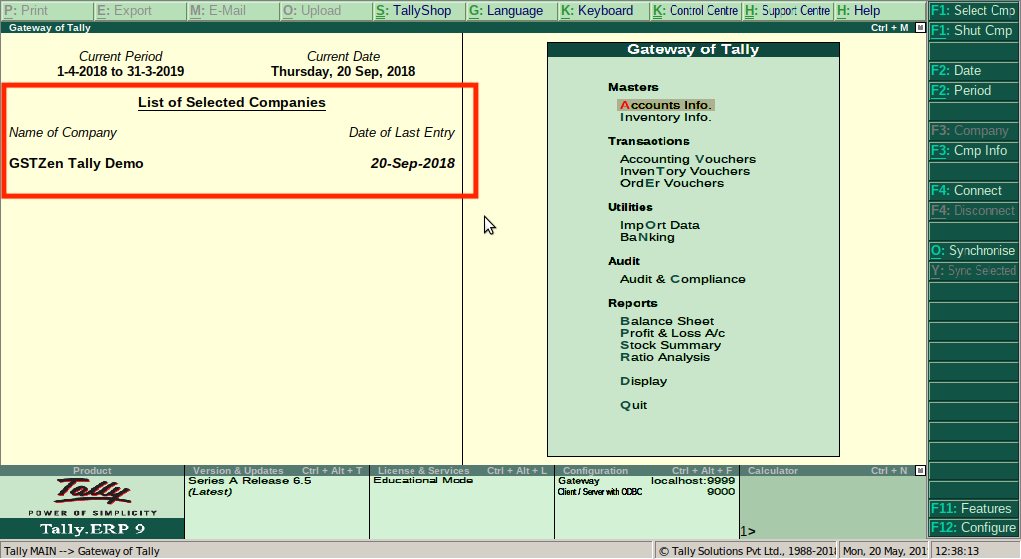
#### STEP 1 – Choose Tally Company
In Tally, open the company whose purchase register you want to import.
{ .px-0 .col-md-9 .offset-md-1 .center-block .img-fluid .cz-img-border .image-process-container-col-sm-9 }
you want to import data from, click on the Button named **”Use this Company”**.
{ .px-0 .col-md-9 .offset-md-1 .center-block .img-fluid .cz-img-border .image-process-container-col-sm-9 }
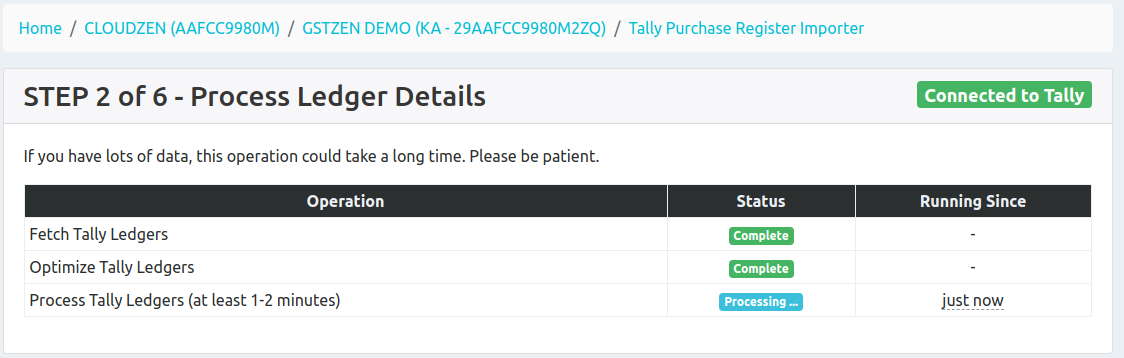
#### STEP 2 – Process Ledger Details
In this page, GSTZen will connect to Tally and obtain details of all your
Ledgers. Based on the amount of data that you have, this operation will
take a few minutes. You do not have to perform any action. Please wait
patiently until this step completed.
{ .px-0 .col-md-9 .offset-md-1 .center-block .img-fluid .cz-img-border .image-process-container-col-sm-9 }
Importing the Ledgers is a one time activity. If you are importing data for
this Company again, you can skip this step. GSTZen will show that old data
is already available and that you can use it.
To use your existing ledger details click on the button **”Use Existing
Ledger Details”** or to get import fresh ledger details, click on the
button **”Process Ledger Details again”**.
{ .px-0 .col-md-9 .offset-md-1 .center-block .img-fluid .cz-img-border .image-process-container-col-sm-9 }
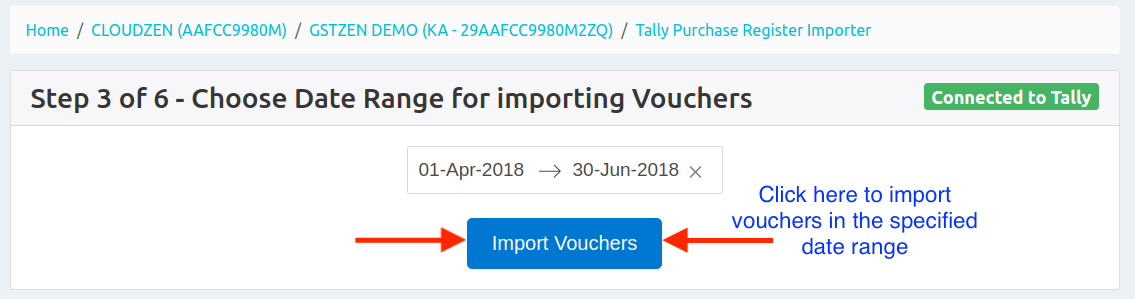
#### STEP 3 – Choose Date Range
In this step, select the date range of Invoices that you want to upload to
GSTZen.
{ .px-0 .col-md-9 .offset-md-1 .center-block .img-fluid .cz-img-border .image-process-container-col-sm-9 }
#### STEP 4 – Downloading Vouchers from Tally
After you have selected the date range, GSTZen will connect to Tally and
obtain details of all Vouchers and Journal entries in that date range.
Please wait patiently until the operation completes. You do not have to
perform any action.
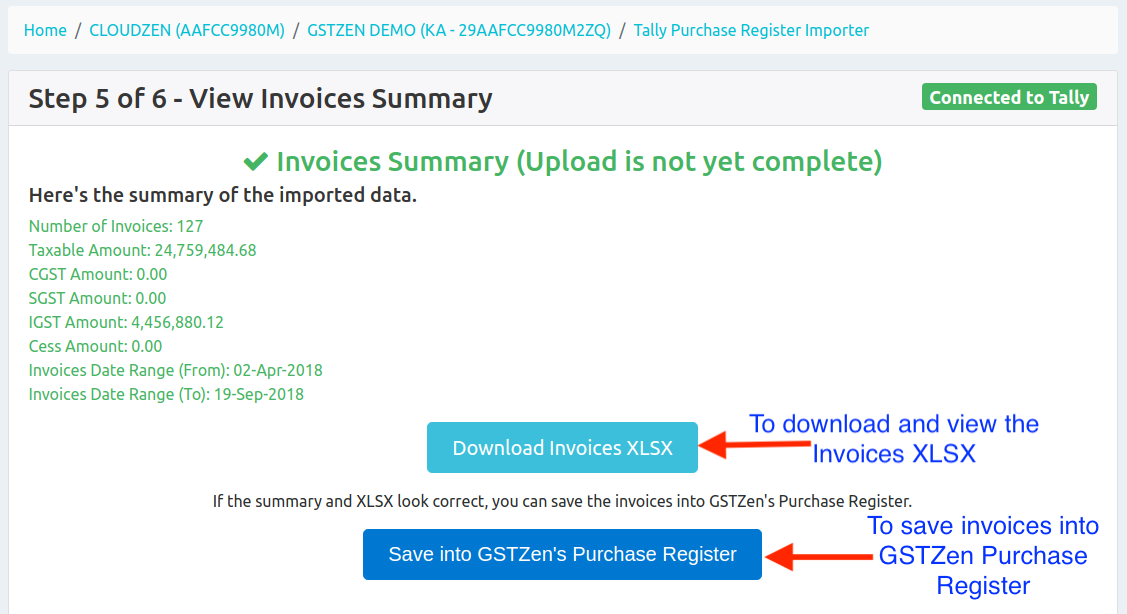
#### STEP 5 – Processing Invoices
GSTZen will read all your Ledger entries and construct purchase invoices
with details such as the Supplier GSTIN, Invoice Date, Invoice Number,
Taxable value and Tax amounts. GSTZen makes these details available in an
Excel file for you to review.
{ .px-0 .col-md-9 .offset-md-1 .center-block .img-fluid .cz-img-border .image-process-container-col-sm-9 }
If everything looks okay, you can confirm and upload these invoices into
GSTZen.
{ .px-0 .col-md-9 .offset-md-1 .center-block .img-fluid .cz-img-border .image-process-container-col-sm-9 }
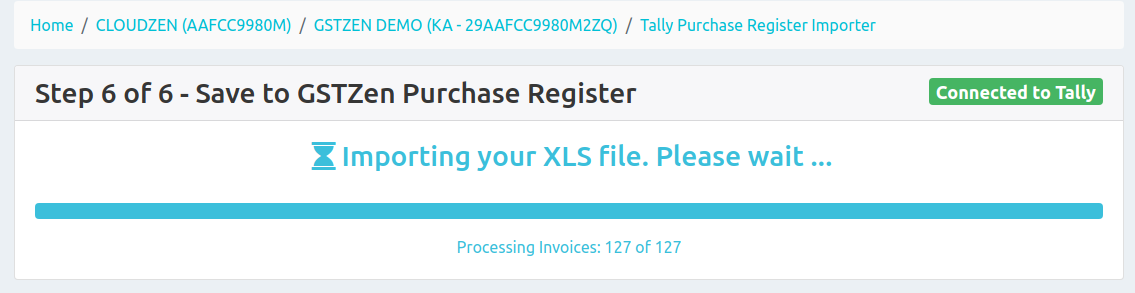
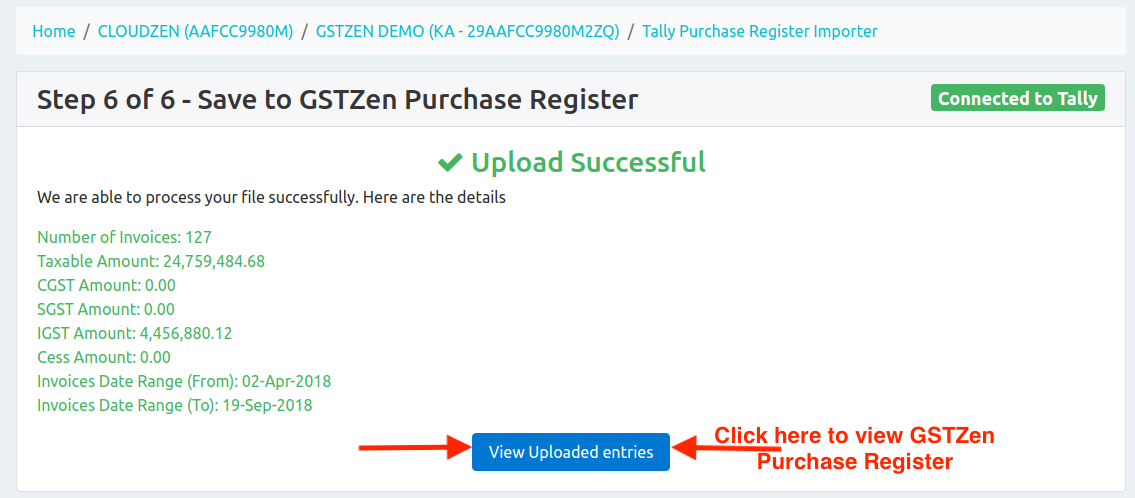
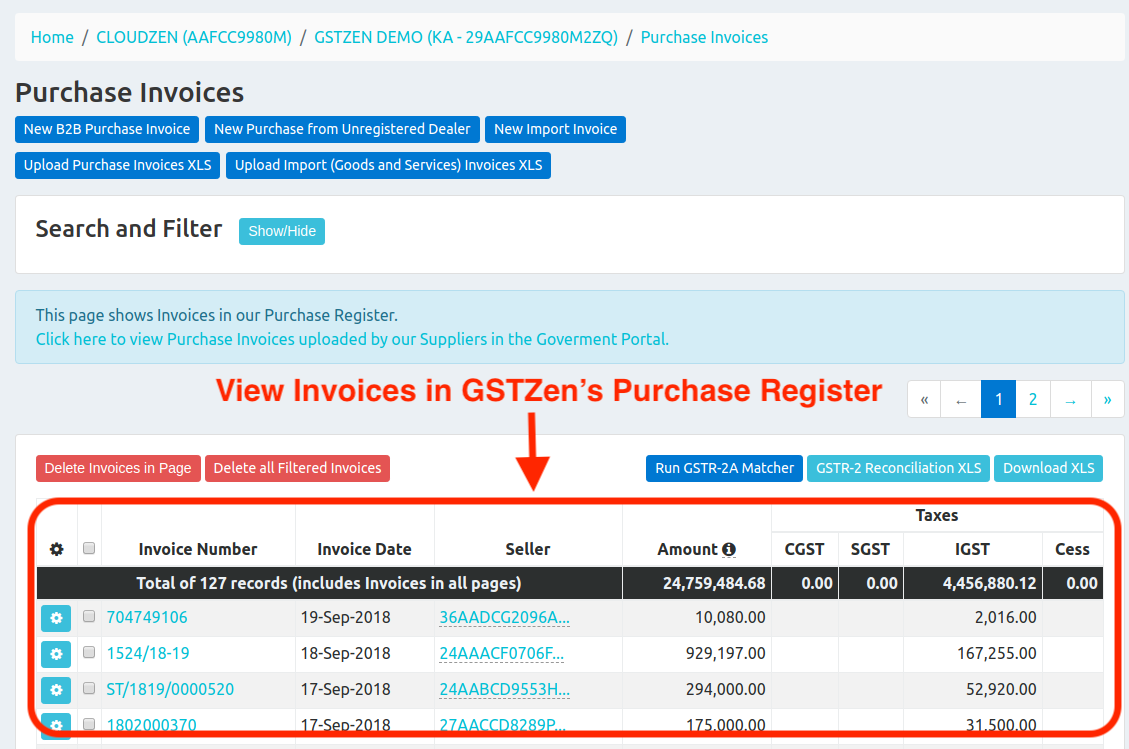
#### STEP 6 – Save to GSTZen Purchase Register
After confirmation you will see a confirmation message saying that the
upload is successful. You can now view the uploaded invoices in GSTZen’s
Purchase Register.
{ .px-0 .col-md-9 .offset-md-1 .center-block .img-fluid .cz-img-border .image-process-container-col-sm-9 }
{ .px-0 .col-md-9 .offset-md-1 .center-block .img-fluid .cz-img-border .image-process-container-col-sm-9 }
{ .px-0 .col-md-9 .offset-md-1 .center-block .img-fluid .cz-img-border .image-process-container-col-sm-9 }–>
You must be logged in to post a comment.